This is the multi-page printable view of this section. Click here to print.
Contributing to Dapr
- 1: Contribution overview
- 2: Giving a presentation on Dapr
- 3: Dapr Roadmap
- 4: Contributing with GitHub Codespaces
- 5: Dapr bot reference
- 6: Docs contributing guide
- 6.1: Contributors guide
- 6.2: Maintainer guide
- 6.3: Suggested Dapr docs templates
- 6.3.1: Conceptual article template
- 6.3.2: Quickstart guide template
- 6.3.3: How-to guide template
- 7: SDK contributing guide
- 7.1: Contributing to the .NET SDK
- 7.2: Contributing to the Go SDK
- 7.3: Contributing to the Java SDK
- 7.4: Contributing to the JavaScript SDK
- 7.5: Contributing to the Python SDK
- 7.6: Contributing to the Rust SDK
- 8: Contributing to Dapr Agents
- 9: Protocol Reference
1 - Contribution overview
Thank you for your interest in Dapr! This document provides the guidelines for how to contribute to the Dapr project through issues and pull requests. Contributions can also come in additional ways such as engaging with the community in community calls, commenting on issues or pull requests, and more.
See the Dapr community repository for more information on community engagement and community membership.
Dapr Repository Index
Below is a list of repositories under the Dapr organization where you can contribute:
Docs: This repository contains the documentation for Dapr. You can contribute by updating existing documentation, fixing errors, or adding new content to improve user experience and clarity. Please see the specific guidelines for docs contributions.
Quickstarts: The Quickstarts repository provides simple, step-by-step guides to help users get started with Dapr quickly. Contributions in this repository involve creating new quickstarts, improving existing ones, or ensuring they stay up-to-date with the latest features.
Runtime: The Dapr runtime repository houses the core runtime components. Here, you can contribute by fixing bugs, optimizing performance, implementing new features, or enhancing existing ones.
Components-contrib: This repository hosts a collection of community-contributed components for Dapr. You can contribute by adding new components, improving existing ones, or reviewing and testing contributions from the community.
SDKs: Dapr SDKs provide libraries for various programming languages to interact with Dapr. You can contribute by improving SDK functionalities, fixing bugs, or adding support for new features. Please see the contribution guidelines for specific SDKs.
CLI: Dapr cli sets up Dapr on a local dev machine or a Kubernetes cluster for launching and managing Dapr instances. Contributions to the CLI repository include adding new features, fixing bugs, improving usability, and ensuring compatibility with the latest Dapr releases. Please see the Development Guide for help in getting started with developing the Dapr cli.
Issues
Issue types
In most Dapr repositories there are usually 4 types of issues:
- Issue/Bug: You’ve found a bug with the code, and want to report it, or create an issue to track the bug.
- Issue/Discussion: You have something on your mind, which requires input form others in a discussion, before it eventually manifests as a proposal.
- Issue/Proposal: Used for items that propose a new idea or functionality. This allows feedback from others before code is written.
- Issue/Question: Use this issue type, if you need help or have a question.
Before submitting
Before you submit an issue, make sure you’ve checked the following:
- Is it the right repository?
- The Dapr project is distributed across multiple repositories. Check the list of repositories if you aren’t sure which repo is the correct one.
- Check for existing issues
- Before you create a new issue, please do a search in open issues to see if the issue or feature request has already been filed.
- If you find your issue already exists, make relevant comments and add your reaction. Use a reaction:
- 👍 up-vote
- 👎 down-vote
- For bugs
- Check it’s not an environment issue. For example, if running on Kubernetes, make sure prerequisites are in place. (state stores, bindings, etc.)
- You have as much data as possible. This usually comes in the form of logs and/or stacktrace. If running on Kubernetes or other environment, look at the logs of the Dapr services (runtime, operator, placement service). More details on how to get logs can be found here.
- For proposals
- Many changes to the Dapr runtime may require changes to the API. In that case, the best place to discuss the potential feature is the main Dapr repo.
- Other examples could include bindings, state stores or entirely new components.
Pull Requests
All contributions come through pull requests. To submit a proposed change, follow this workflow:
- Make sure there’s an issue (bug or proposal) raised, which sets the expectations for the contribution you are about to make.
- Fork the relevant repo and create a new branch
- Some Dapr repos support Codespaces to provide an instant environment for you to build and test your changes.
- See the Developing Dapr docs for more information about setting up a Dapr development environment.
- Create your change
- Code changes require tests
- Update relevant documentation for the change
- Commit with DCO sign-off and open a PR
- Wait for the CI process to finish and make sure all checks are green
- A maintainer of the project will be assigned, and you can expect a review within a few days
Use work-in-progress PRs for early feedback
A good way to communicate before investing too much time is to create a “Work-in-progress” PR and share it with your reviewers. The standard way of doing this is to add a “[WIP]” prefix in your PR’s title and assign the do-not-merge label. This will let people looking at your PR know that it is not well baked yet.
Use of Third-party code
- Third-party code must include licenses.
Developer Certificate of Origin: Signing your work
Every commit needs to be signed
The Developer Certificate of Origin (DCO) is a lightweight way for contributors to certify that they wrote or otherwise have the right to submit the code they are contributing to the project. Here is the full text of the DCO, reformatted for readability:
By making a contribution to this project, I certify that:
    (a) The contribution was created in whole or in part by me and I have the right to submit it under the open source license indicated in the file; or
    (b) The contribution is based upon previous work that, to the best of my knowledge, is covered under an appropriate open source license and I have the right under that license to submit that work with modifications, whether created in whole or in part by me, under the same open source license (unless I am permitted to submit under a different license), as indicated in the file; or
    (c) The contribution was provided directly to me by some other person who certified (a), (b) or (c) and I have not modified it.
    (d) I understand and agree that this project and the contribution are public and that a record of the contribution (including all personal information I submit with it, including my sign-off) is maintained indefinitely and may be redistributed consistent with this project or the open source license(s) involved.
Contributors sign-off that they adhere to these requirements by adding a Signed-off-by line to commit messages.
This is my commit message
Signed-off-by: Random J Developer <random@developer.example.org>
Git even has a -s command line option to append this automatically to your commit message:
$ git commit -s -m 'This is my commit message'
Each Pull Request is checked whether or not commits in a Pull Request do contain a valid Signed-off-by line.
I didn’t sign my commit, now what?!
No worries - You can easily replay your changes, sign them and force push them!
git checkout <branch-name>
git commit --amend --no-edit --signoff
git push --force-with-lease <remote-name> <branch-name>
Code of Conduct
Please see the Dapr community code of conduct.
2 - Giving a presentation on Dapr
We encourage community members to give presentations on Dapr. To get you started quickly, we offer three PowerPoint files:
- dapr-slidedeck.pptx, this is a 150+ page slide deck and contains: an overview of Dapr, all of its building block APIs, cross-cutting concerns, hosting options, and assets to create your own architecture diagrams.
- dapr-workflow-slidedeck.pptx, this is a dedicated slide deck about Dapr Workflow and contains: durable execution concept, workflow authoring, workflow patterns, workflow management, and challenges & tips.
- dapr-agents-slidedeck.pptx, this is a dedicated slide deck about Dapr Agents and contains: AI agents explanation, Dapr Agent types, multi-agent systems, and agentic patterns.
There is a downloadable zip file that contains all slide decks.
Download the Dapr Presentation DecksIf you’re using the PowerPoint template with MacOS, please install the Space Grotesk font to ensure the text is rendered properly:
brew install --cask font-space-grotesk
Giving a Dapr presentation
- Begin by downloading the Dapr Presentation Decks. These contain slides, diagrams, and graphical assets.
- Next, review the docs to make sure you understand the concepts.
- Use the Dapr quickstarts repo to show demos of how to use Dapr.
- Once you’ve done a Dapr presentation, claim the Dapr Presenter badge by adding your presentation to this table in the Dapr Community repository.
Dapr presentations from the community
If you need some inspiration, watch these Dapr presentations by the community via this Dapr YouTube playlist:
Additional resources
There are other Dapr resources on the community repo.
3 - Dapr Roadmap
See this document to view the Dapr project’s roadmap.
4 - Contributing with GitHub Codespaces
GitHub Codespaces is the easiest way to get up and running for contributing to a Dapr repo. In as little as a single click, you can have an environment with all of the prerequisites ready to go in your browser.
Features
- Click and Run: Get a dedicated and sandboxed environment with all of the required frameworks and packages ready to go.
- Usage-based Billing: Only pay for the time you spend developing in the Codespaces. Environments are spun down automatically when not in use.
- Portable: Run in your browser or in Visual Studio Code, or connect to it using SSH.
Open a Dapr repo in a Codespace
To open a Dapr repository in a Codespace, select “Code” from the repo homepage and “Open with Codespaces”:
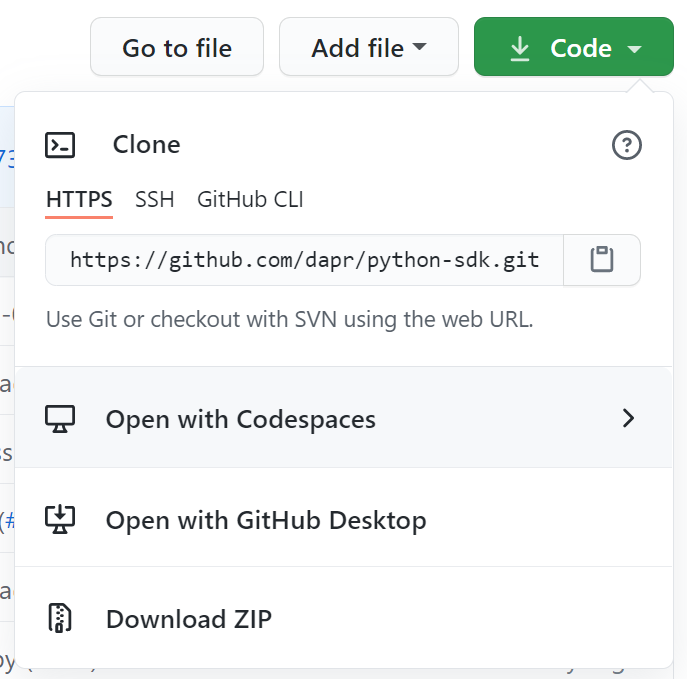
If you haven’t already forked the repo, creating the Codespace will also create a fork for you and use it inside the Codespace.
Supported repos
Developing Dapr Components in a Codespace
Developing a new Dapr component requires working with both the dapr/components-contrib and dapr/dapr repos. It is recommended to place both folders inside the /workspaces directory, side-by-side.
If you created a Codespace from dapr/dapr
If your Codespaces was started from the dapr/dapr repo or a fork of that, you will need to clone the dapr/components-contrib repository (or your fork of that) inside /workspaces/components-contrib.
First, make sure you’ve authenticated with the GitHub CLI:
# Run this command and follow the prompts
# Most users should accept the default choices
gh auth login
Clone the repo:
# If you want to use your fork of dapr/components-contrib, replace this with your fork (e.g. "yourusername/components-contrib")
# Make sure you've forked the repo before doing this
REPO=dapr/components-contrib
cd /workspaces
gh repo clone "$REPO" /workspaces/components-contrib
Then, add the folder to current workspace:
code -a /workspaces/components-contrib
If you created a Codespace from dapr/components-contrib
If your Codespaces was started from the dapr/components-contrib repo or a fork of that, you will need to clone the dapr/dapr repository (or your fork of that) inside /workspaces/dapr.
First, make sure you’ve authenticated with the GitHub CLI:
# Run this command and follow the prompts
# Most users should accept the default choices
gh auth login
Clone the repo:
# If you want to use your fork of dapr/dapr, replace this with your fork (e.g. "yourusername/dapr")
# Make sure you've forked the repo before doing this
REPO=dapr/dapr
cd /workspaces
gh repo clone "$REPO" /workspaces/dapr
Then, add the folder to current workspace:
code -a /workspaces/dapr
Related links
5 - Dapr bot reference
Dapr bot is triggered by a list of commands that helps with common tasks in the Dapr organization. It is set up individually for each repository (example) and can be configured to run on specific events. Below is a list of commands and the list of repositories they are implemented on.
Command reference
| Command | Target | Description | Who can use | Repository |
|---|---|---|---|---|
/assign | Issue | Assigns an issue to a user or group of users | Anyone | dapr, docs, quickstarts, cli, components-contrib, go-sdk, js-sdk, java-sdk, python-sdk, dotnet-sdk, rust-sdk |
/ok-to-test | Pull request | dapr: trigger end to end testscomponents-contrib: trigger conformance and certification tests | Users listed in the bot | dapr, components-contrib |
/ok-to-perf | Pull request | Trigger performance tests. | Users listed in the bot | dapr |
/make-me-laugh | Issue or pull request | Posts a random joke | Users listed in the bot | dapr, components-contrib |
Label reference
You can query issues created by the Dapr bot by using the created-by/dapr-bot label (query).
| Label | Target | What does it do? | Repository |
|---|---|---|---|
docs-needed | Issue | Creates a new issue in dapr/docs to track doc work | dapr |
sdk-needed | Issue | Creates new issues across the SDK repos to track SDK work | dapr |
documentation required | Issue or pull request | Creates a new issue in dapr/docs to track doc work | components-contrib |
new component | Issue or pull request | Creates a new issue in dapr/dapr to register the new component | components-contrib |
6 - Docs contributing guide
6.1 - Contributors guide
In this guide, you’ll learn how to contribute to the Dapr docs repository. Since Dapr docs are published to docs.dapr.io, you must make sure your contributions compile and publish correctly.
Prerequisites
Before contributing to the Dapr docs:
- Review the guidance around general Dapr project contributions.
- Install and set up your local environment with Hugo with the Docsy theme. Follow the instructions in the repository README.md.
- Fork and clone the docs repository.
Branch guidance
The Dapr docs handles branching differently than most code repositories. Instead of a main branch, every branch is labeled to match the major and minor version of a runtime release. For the full list visit the Docs repo
Generally, all of your docs updates should point to docs branch for the latest release of Dapr. The latest release is the default branch [https://github.com/dapr/docs]. For example, if you are fixing a typo, adding notes, or clarifying a point, make your changes into the default Dapr branch.
For any docs changes applicable to a release candidate or a pre-release version of the docs, point your changes into that particular branch. For example, if you are documenting an upcoming change to a component or the runtime, make your changes to the pre-release branch.
Style and tone
Style and tone conventions should be followed throughout all Dapr documentation for consistency across all docs:
| Style/Tone | Guidance |
|---|---|
| Casing | Use upper case only:
|
| Headers and titles | Headers and titles must be brief, but descriptive and clear. |
| Use simple sentences | Write easy-to-read, scannable sentences. Tip: Skip the formal tone and write as if you were talking directly to the reader. |
| Avoid the first person | Instead of first person “I”, “we”, and “our”, use second person “you” and “your”. |
| Assume a “new developer” audience | Some seemingly obvious steps to an experienced developer might not be as obvious to a new developer. Give the reader more explicit, thorough instructions. |
| Use present tense | Avoid sentences like “this command will install Redis”. Instead, use “This command installs Redis”. |
Diagrams and images
Diagrams and images are invaluable visual aids for documentation pages. Use the diagram style and icons in the Dapr Diagrams template deck.
The process for creating diagrams for your documentation:
- Download the Dapr Diagrams template deck to use the icons and colors.
- Add a new slide and create your diagram.
- Screen capture the diagram as high-res PNG file and save in the images folder.
- Name your PNG files using the convention of a concept or building block so that they are grouped.
- For example:
service-invocation-overview.png. - For more information on calling out images using shortcode, see the Images guidance section below.
- Add the diagram to the appropriate section in your documentation using the HTML
<image>tag. - In your PR, comment the diagram slide (not the screen capture) so it can be reviewed and added to the diagram deck by maintainers.
Contributing a new docs page
If you’re creating a new article, make sure you:
- Place the new document in the correct place in the hierarchy.
- Avoid creating new sections. Most likely, the proper place is already in the docs hierarchy.
- Include complete Hugo front-matter.
Select the topic type below to view a suggested template to help you get started.
| Topic type | What is it? |
|---|---|
| Concept | Answers the question, “What problems does this help me solve?” Avoid repeating the API or component spec; provide more details. |
| Quickstart | Provides a “Five minutes to wow” experience. Walk the reader quickly through a feature or API and how it works in a controlled example. |
| How-to | Provides a detailed, practical step-by-step through a Dapr feature or technology. Encourage the reader to try with their own scenario, rather than the controlled scenario provided in a quickstart. |
Requirements for docs.dapr.io
Make sure your contribution doesn’t break the website build. The way Hugo builds the website requires following the guidance below:
Files and folder names
File and folder names should be globally unique.
- \service-invocation
- service-invocation-overview.md
Front-matter
Front-matter is what takes regular markdown files and upgrades them into Hugo compatible docs for rendering into the nav bars and ToCs.
Every page needs a section at the top of the document like this:
---
type: docs
title: "TITLE FOR THE PAGE"
linkTitle: "SHORT TITLE FOR THE NAV BAR"
weight: (number)
description: "1+ SENTENCES DESCRIBING THE ARTICLE"
---
Example
---
type: docs
title: "Service invocation overview"
linkTitle: "Overview"
weight: 10
description: "A quick overview of Dapr service invocation and how to use it to invoke services within your application"
---
Weight determines the order of the pages in the left sidebar, with 0 being the top-most.
Front-matter should be completed with all fields including type, title, linkTitle, weight, and description.
titleshould be 1 sentence, no period at the endlinkTitleshould be 1-3 words, with the exception of How-to at the front.descriptionshould be 1-2 sentences on what the reader will learn, accomplish, or do in this doc.
As per the styling conventions, titles should only capitalize the first word and proper nouns, with the exception of “How-To:”
- “Getting started with Dapr service invocation”
- “How-To: Setup a local Redis instance”
Referencing other pages
Hugo ref and relref shortcodes are used to reference other pages and sections. These shortcodes also allow the build to break if a page is incorrectly renamed or removed.
For example, this shortcode, written inline with the rest of the markdown page, will link to the _index.md of the section/folder name:
{{% ref "folder" %}}
While this shortcode will link to a specific page:
{{% ref "page" %}}
All pages and folders need to have globally unique names in order for the ref shortcode to work properly. If there are duplicate names, the build will break and an error will be thrown.
Referencing sections in other pages
To reference a specific section in another page, add #section-short-name to the end of your reference.
As a general rule, the section short name is the text of the section title, all lowercase, with spaces changed to “-”. You can check the section short name by:
- Visiting the website page.
- Clicking the link icon (🔗) next to the section.
- Seeing how the URL renders in the nav bar.
- Copying the content after the “#” for your section shortname.
As an example, for this specific section, the complete reference to the page and section would be:
{{% ref "contributing-docs#referencing-sections-in-other-pages" %}}
Shortcodes
The following are useful shortcodes for writing Dapr documentation
Images
The markdown spec used by Docsy and Hugo does not give an option to resize images using markdown notation. Instead, raw HTML is used.
Begin by placing images under /daprdocs/static/images with the naming convention of [page-name]-[image-name].[png|jpg|svg].
Then link to the image using:
<img src="/images/[image-filename]" width=1000 alt="Description of image">
Don’t forget to set the alt attribute to keep the docs readable and accessible.
Example
This HTML will display the dapr-overview.png image on the overview.md page:
<img src="/images/overview-dapr-overview.png" width=1000 alt="Overview diagram of Dapr and its building blocks">
Tabbed content
Tabs are made possible through Hugo shortcodes.
The overall format is:
[Content for Tab1]
[Content for Tab2]
All content you author will be rendered to markdown, so you can include images, code blocks, YouTube videos, and more.
Example
powershell -Command "iwr -useb https://raw.githubusercontent.com/dapr/cli/master/install/install.ps1 | iex"
wget -q https://raw.githubusercontent.com/dapr/cli/master/install/install.sh -O - | /bin/bash
brew install dapr/tap/dapr-cli
This example will render to this:
powershell -Command "iwr -useb https://raw.githubusercontent.com/dapr/cli/master/install/install.ps1 | iex"
wget -q https://raw.githubusercontent.com/dapr/cli/master/install/install.sh -O - | /bin/bash
brew install dapr/tap/dapr-cli
YouTube videos
Hugo can automatically embed YouTube videos using a shortcode:
{{% youtube [VIDEO ID] %}}
Example
Given the video https://youtu.be/dQw4w9WgXcQ
The shortcode would be:
{{% youtube dQw4w9WgXcQ %}}
Buttons
To create a button in a webpage, use the button shortcode.
An optional “newtab” parameter will indicate if the page should open in a new tab. Options are “true” or “false”. Default is “false”, where the page will open in the same tab.
Link to an external page
{{% button text="My Button" link="https://example.com" %}}
Link to another docs page
You can also reference pages in your button as well:
{{% button text="My Button" page="contributing" newtab="true" %}}
Button colors
You can customize the colors using the Bootstrap colors:
{{% button text="My Button" link="https://example.com" color="primary" %}}
{{% button text="My Button" link="https://example.com" color="secondary" %}}
{{% button text="My Button" link="https://example.com" color="success" %}}
{{% button text="My Button" link="https://example.com" color="danger" %}}
{{% button text="My Button" link="https://example.com" color="warning" %}}
{{% button text="My Button" link="https://example.com" color="info" %}}
References
Translations
The Dapr Docs supports adding language translations into the docs using git submodules and Hugo’s built in language support.
You can find an example PR of adding Chinese language support in PR 1286.
Steps to add a language:
Open an issue in the Docs repo requesting to create a new language-specific docs repo
Once created, create a git submodule within the docs repo:
git submodule add <remote_url> translations/<language_code>Add a language entry within
daprdocs/config.toml:[languages.<language_code>] title = "Dapr Docs" weight = 3 contentDir = "content/<language_code>" languageName = "<language_name>"Create a mount within
daprdocs/config.toml:[[module.mounts]] source = "../translations/docs-<language_code>/content/<language_code>" target = "content" lang = "<language_code>"Repeat above step as necessary for all other translation directories.
Next steps
Get started by copying and working from one of the Dapr doc templates.
6.2 - Maintainer guide
In this guide, you’ll learn how to perform routine Dapr docs maintainer and approver responsibilities. In order to successfully accomplish these tasks, you need either approver or maintainer status in the dapr/docs repo.
To learn how to contribute to Dapr docs, review the Contributor guide.
Branch guidance
The Dapr docs handles branching differently than most code repositories. Instead of a main branch, every branch is labeled to match the major and minor version of a runtime release.
For the full list, visit the Docs repo.
Read the contributor’s guide for more information about release branches.
Upmerge from current release branch to the pre-release branch
As a docs approver or maintainer, you need to perform routine upmerges to keep the pre-release branch aligned with updates to the current release branch. It is recommended to upmerge the current branch into the pre-release branch on a weekly basis.
For the following steps, treat v1.0 as the current release and v1.1 as the upcoming release.
Open Visual Studio Code to the Dapr docs repo.
From your local repo, switch to the latest branch (
v1.0) and synchronize changes:git pull upstream v1.0 git push origin v1.0Switch to the upcoming branch (
v1.1) and synchronize changes:git pull upstream v1.1 git push origin v1.1Create a new branch based off of the upcoming release:
git checkout -b upmerge_MM-DDOpen a terminal and stage a merge from the latest release into the upmerge branch:
git merge --no-ff --no-commit v1.0In the terminal, make sure included files look accurate. Inspect any merge conflicts in VS Code. Remove configuration changes or version information that does not need to be merged.
Commit the staged changes and push to the upmerge branch (
upmerge_MM-DD).Open a PR from the upmerge branch to the upcoming release branch (
v1.1).Review the PR and double check that no unintended changes were pushed to the upmerge branch.
Release process
Dapr docs must align with features and updates included in the Dapr project release. Leading up to the Dapr release date, make sure:
- All new features or updates have been sufficiently documented and reviewed.
- Docs PRs for the upcoming release point to the release branch.
For the following steps, treat v1.0 as the latest release and v1.1 as the upcoming release.
The release process for docs requires the following:
- An upmerge of the latest release into the upcoming release branch
- An update to the latest and upcoming release Hugo configuration files
- A new Azure Static Web App for the next version
- A new DNS entry for the next version’s website
- A new git branch for the next version
Upmerge
First, perform a docs upmerge from the latest release to the upcoming release branch.
Update Hugo Configuration
After upmerge, prepare the docs branches for the release. In two separate PRs, you need to:
- Archive the latest release.
- Bring the preview/release branch as the current, live version of the docs.
- Create a new preview branch.
Latest release
These steps will prepare the latest release branch for archival.
Open VS Code to the Dapr docs repo.
Switch to the latest branch (
v1.0) and synchronize changes:git pull upstream v1.0 git push origin v1.0Create a new branch based off of the latest release:
git checkout -b release_v1.0In VS Code, navigate to
hugo.yamllocated in the root.Add the following configuration to the
# Versioningsection (around line 121 and onwards):version_menu: "v1.0" version: "v1.0" archived_version: true url_latest_version: "https://docs.dapr.io" versions: - version: v1.2 (preview) url: https://v1-2.docs.dapr.io - version: v1.1 (latest) url: "#" - version: v1.0 url: https://v1-0.docs.dapr.ioDelete
.github/workflows/website-root.yml.Commit the staged changes and push to your branch (
release_v1.0).Open a PR from
release_v1.0tov1.0.Have a docs maintainer or approver review. Wait to merge the PR until release.
Upcoming release
These steps will prepare the upcoming release branch for promotion to latest release.
Open VS Code to the Dapr docs repo.
Switch to the upcoming release branch (
v1.1) and synchronize changes:git pull upstream v1.1 git push origin v1.1Create a new branch based off of the upcoming release:
git checkout -b release_v1.1In VS Code, navigate to
hugo.yamllocated in the root.Update line 1 to
baseURL: https://docs.dapr.io/.Update the
# Versioningsection (around line 121 and onwards) to display the correct versions and tags:# Versioning version_menu: "v1.1 (latest)" version: "v1.1" archived_version: false url_latest_version: https://docs.dapr.io github_branch: v1.1 versions: - version: v1.2 (preview) url: https://v1-2.docs.dapr.io - version: v1.1 (latest) url: "#" - version: v1.0 url: https://v1-0.docs.dapr.ioNavigate to
.github/workflows/website-root.yml.Update the branches which trigger the workflow:
name: Azure Static Web App Root

on:
  push:
    branches:
      - v1.1
  pull_request:
    types: [opened, synchronize, reopened, closed]
    branches:
      - v1.1
Navigate to
/README.md.Update the versions table:
| Branch                                                       | Website                    | Description                                                                                      |
| ------------------------------------------------------------ | -------------------------- | ------------------------------------------------------------------------------------------------ |
| [v1.1](https://github.com/dapr/docs) (primary)               | https://docs.dapr.io       | Latest Dapr release documentation. Typo fixes, clarifications, and most documentation goes here. |
| [v1.2](https://github.com/dapr/docs/tree/v1.2) (pre-release) | https://v1-2.docs.dapr.io/ | Pre-release documentation. Doc updates that are only applicable to v1.2+ go here.                |
- Update the Supported versions table in
support-release-policy.md; add a new line at the top of the table with the new version of the runtime and SDKs. Change the releases which are older than n-2 to beUnsupported. - Update the
dapr-latest-version.htmlshortcode partial to the new minor/patch version (in this example,1.1.0and1.1). - Commit the staged changes and push to your branch (
release_v1.1). - Open a PR from
release/v1.1tov1.1. - Have a docs maintainer or approver review. Wait to merge the PR until release.
Future preview branch
Create preview branch
- In GitHub UI, select the branch drop-down menu and select View all branches.
- Click New branch.
- In New branch name, enter the preview branch version number. In this example, it would be
v1.2. - Select v1.1 as the source.
- Click Create new branch.
Configure preview branch
In a terminal window, navigate to the
docsrepo.Switch to the upcoming release branch (
v1.1) and synchronize changes:git pull upstream v1.1 git push origin v1.1Create a new branch based on
v1.1and name itv1.2:
git checkout -b release_v1.1
Rename
.github/workflows/website-v1-1.ymlto.github/workflows/website-v1-2.yml.Open
.github/workflows/website-v1-2.ymlin VS Code and update the name, trigger, and deployment target to 1.2:name: Azure Static Web App v1.2 on: push: branches: - v1.2 pull_request: types: [opened, synchronize, reopened, closed] branches: - v1.2 ... with: azure_static_web_apps_api_token: ${{ secrets.AZURE_STATIC_WEB_APPS_V1_2 }} repo_token: ${{ secrets.GITHUB_TOKEN }} ... with: azure_static_web_apps_api_token: ${{ secrets.AZURE_STATIC_WEB_APPS_V1_2 }} skip_deploy_on_missing_secrets: trueNavigate to
daprdocs/config.tomland update thebaseURLto point to the new preview website:baseURL = "https://v1-2.docs.dapr.io"Update the
# GitHub Informationand# Versioningsections (around line 148) to display the correct versions and tags:# GitHub Information github_repo = "https://github.com/dapr/docs" github_project_repo = "https://github.com/dapr/dapr" github_subdir = "daprdocs" github_branch = "v1.2" # Versioning version_menu = "v1.2 (preview)" version = "v1.2" archived_version = false url_latest_version = "https://docs.dapr.io" [[params.versions]] version = "v1.2 (preview)" url = "#" [[params.versions]] version = "v1.1 (latest)" url = "https://docs.dapr.io" [[params.versions]] version = "v1.0" url = "https://v1-0.docs.dapr.io"Commit the staged changes and push to a new PR against the v1.2 branch.
Hold on merging the PR until after release and the other
v1.0andv1.1PRs have been merged.
Create new website for future release
Next, create a new website for the future Dapr release. To do this, you’ll need to:
- Deploy an Azure Static Web App.
- Configure DNS via request from CNCF.
Prerequisites
- Docs maintainer status in the
dapr/docsrepo. - Access to the active Dapr Azure Subscription with Contributor or Owner access to create resources.
- Azure Developer CLI installed on your machine.
- Your own fork of the
dapr/docsrepo cloned to your machine.
Deploy Azure Static Web App
Deploy a new Azure Static Web App for the future Dapr release. For this example, we use v1.1 as the future release.
In a terminal window, navigate to the
iac/swafolder in thedapr/docsdirectory.cd .github/iac/swaLog into Azure Developer CLI (
azd) using the Dapr Azure subscription.azd loginIn the browser prompt, verify you’re logging in as Dapr and complete the login.
In the same terminal, set these environment variables:
export AZURE_RESOURCE_GROUP=docs-website
export IDENTITY_RESOURCE_GROUP=dapr-identities
export AZURE_STATICWEBSITE_NAME==daprdocs-v1-1
Where daprdocs-v1-1 should be updated with the new preview version.
Create a new
azdenvironment.azd env newWhen prompted, enter a new environment name. For this example, you’d name the environment something like:
dapr-docs-v1-1.Once the environment is created, deploy the Dapr docs SWA into the new environment using the following command:
azd upWhen prompted, select an Azure subscription (Dapr Tests) and deployment location (West US 2).
Configure the SWA in the Azure portal
Head over to the Dapr subscription in the Azure portal and verify that your new Dapr docs site has been deployed.
Optionally, grant the correct minimal permissions for inbound publishing and outbound access to dependencies using the Static Web App > Access control (IAM) blade in the portal.
Configure DNS
In the Azure portal, from the new SWA you just created, naviage to Custom domains from the left side menu.
Copy the “CNAME” value of the web app.
Using your own account, submit a CNCF ticket to create a new domain name mapped to the CNAME value you copied. For this example, to create a new domain for Dapr v1.1, you’d request to map to
v1-1.docs.dapr.io.Request resolution may take some time.
Once the new domain has been confirmed, return to the static web app in the portal.
Navigate to the Custom domains blade and select + Add.
Select Custom domain on other DNS.
Enter
v1-1.docs.dapr.iounder Domain name. Click Next.Keep Hostname record type as
CNAME, and copy the value of Value.Click Add.
Navigate to
https://v1-1.docs.dapr.ioand verify a blank website loads correctly.
You can repeat these steps for any preview versions.
On the new Dapr release date
- Wait for all code/containers/Helm charts to be published.
- Merge the PR from
release_v1.0tov1.0. Delete the release/v1.0 branch. - Merge the PR from
release_v1.1tov1.1. Delete the release/v1.1 branch. - Merge the PR from
release_v1.2tov1.2. Delete the release/v1.2 branch.
Congrats on the new docs release! 🚀 🎉 🎈
Pull in SDK doc updates
SDK docs live in each of the SDK repos. Changes made to the SDK docs are pushed to the relevant SDK repo. For example, to update the Go SDK docs, you push changes to the dapr/go-sdk repo. Until you pull the latest dapr/go-sdk commit into the dapr/docs current version branch, your Go SDK docs updates won’t be reflected on the Dapr docs site.
To bring updates to the SDK docs live to the Dapr docs site, you need to perform a straightforward git pull. This example refers to the Go SDK, but applies to all SDKs.
Pull the latest upstream into your local
dapr/docsversion branch.Change into the root of the
dapr/docsdirectory.Change into the Go SDK repo. This command takes you out of the
dapr/docscontext and into thedapr/go-sdkcontext.cd sdkdocs/goSwitch to the
mainbranch indapr/go-sdk.git checkout mainPull the latest Go SDK commit.
git pull upstream mainChange into the
dapr/docscontext to commit, push, and create a PR.
Next steps
6.3 - Suggested Dapr docs templates
6.3.1 - Conceptual article template
Contributing a new conceptual or overview article
Conceptual (or overview) articles answer the questions:
- Why should you care about this feature?
- What problems does it help you solve?
While a component, API, or SDK spec may help readers understand how to use or work with these features, a conceptual article provides more depth and context. Link off to the spec article, but try not to simply repeat the spec.
When naming your conceptual article, make sure it is consistent with the spec in terms of names, parameters, and terminology. Make sure you update both as needed.
Note
This template is only a suggestion. Feel free to change based on your document’s purpose.Learn more about contributing to the Dapr docs, like front-matter and shortcodes.
Template
---
type: #Required; docs
title: #Required; Brief, clear title
linkTitle: #Required; Brief title
weight: #Required; Use the correct weight based on hierarchy
description: #Required; One-sentence description of what to expect in the article
---

<!--
Remove all the comments in this template before opening a PR.
-->

<!--
H1: The title in the Hugo front-matter serves as the article's markdown H1.
-->

<!-- Introductory paragraph
Required. Brief intro that describes the concepts that the article will cover. Link off to the appropriate reference, specs, or how-to guides to provide context. -->

<!--
Include a diagram or image, if possible.
-->

## <Section 1 H2>

<!--
Add your content here.
-->

## <Section 2 H2>

<!--
Each H2 step should start with a noun/descriptive word.
-->

## <Section 3 H2>

<!--
Add your content here.
-->

<!--
Include diagrams or images throughout, where applicable.
-->

## Try out <concept>

<!--
If applicable, include a section with links to the related quickstart, how-to guides, or tutorials. -->

### Quickstarts and tutorials

Want to put the Dapr <topic> API to the test? Walk through the following quickstart and tutorials to see <topic> in action:

| Quickstart/tutorial | Description |
| ------------------- | ----------- |
| [<topic> quickstart](link) | Description of the quickstart. |
| [<topic> tutorial](link) | Description of the tutorial. |

### Start using <topic> directly in your app

Want to skip the quickstarts? Not a problem. You can try out the <topic> building block directly in your application. After [Dapr is installed](link), you can begin using the <topic> API, starting with [the <topic> how-to guide](link).


-->

## Next steps

<!--
Link to related pages and examples. For example, the related API spec, related building blocks, etc.
-->
6.3.2 - Quickstart guide template
Contributing a new quickstart guide
Dapr quickstart guides consist of quick instructions that walk readers through a prepared quickstart, saved to the dapr/quickstarts repo. These quickstarts package an entire feature or building block in one place, making it easy for the reader to experience how it works without compromising their own project.
The quickstart instructions should be succinct, direct, and clear. The sole purpose of a quickstart guide is to simply instruct a reader through the prepared quickstart. If you’d like to explain the concepts behind the quickstart, direct the reader to a concept article for more context.
Note
This template is only a suggestion. Feel free to change based on your document’s purpose.Learn more about contributing to the Dapr docs, like front-matter and shortcodes.
Template
---
type: #Required; docs
title: #Required; "Quickstart: Brief, clear title"
linkTitle: #Required; This will display in the docs table of contents
weight: #Required; Use the correct weight based on hierarchy
description: #Required; One-sentence description of what to expect in the article
---

<!--
Remove all the comments in this template before opening a PR.
-->

<!--
H1: The title in the Hugo front-matter serves as the article's markdown H1.
-->

<!-- Introductory paragraph
Required. Light intro that briefly describes what the quickstart will cover. Link off to the appropriate concept or overview docs to provide context. -->

<!--
Include a diagram or image, if possible.
-->

<!--
Make sure the quickstart includes examples for multiple programming languages.
-->

## Pre-requisites

<!--
Make sure the reader is prepared for a successful quickstart walk through by listing what they may need.
-->

## Step 1: Set up the environment

<!--
Link to the quickstart sample for the reader to clone.
-->

## Step 2: <action or task>

<!--
Each H2 step should start with a verb/action word.
-->

<!--
Include code snippets where possible.
-->

## Tell us what you think!

We're continuously working to improve our Quickstart examples and value your feedback. Did you find this quickstart helpful? Do you have suggestions for improvement?

Join the discussion in our [discord channel](https://discord.gg/22ZtJrNe).

<!-- Since Dapr is an open community of contributors, make sure to provide a link to the discord discussion to welcome feedback.
-->

## Next steps

<!--
Link to related pages and examples. For example, the building block overview, the HTTP version of an SDK quickstart sample, etc.
-->

<!--
Use the button shortcode to direct readers to more in-depth, related scenarios, like the Dapr tutorials.
-->
6.3.3 - How-to guide template
Contributing a new how-to guide
How-to guides provide step-by-step practical guidance to readers who wish to:
- Enable a feature
- Integrate a technology
- Use Dapr in a specific scenario
How-to guides can be considered “next-level”, self-guided docs compared to quickstarts. How-to scenarios will take longer and can be more easily applied to the reader’s individual project or environment.
When naming your how-to document, include the sub-directory name in the file name. If you need to create a new sub-directory, make sure it’s descriptive and includes the relevant component or concept name. For example, pubsub-namespaces.
Note
This template is only a suggestion. Feel free to change based on your document’s purpose.Learn more about contributing to the Dapr docs, like front-matter and shortcodes.
Template
---
type: #Required; docs
title: #Required; "How to: Brief, clear title"
linkTitle: #Required; "How to: Shorter than regular title, to show in table of contents"
weight: #Required; Use the correct weight based on hierarchy
description: #Required; One-sentence description of what to expect in the article
---

<!--
Remove all the comments in this template before opening a PR.
-->

<!--
H1: The title in the Hugo front-matter serves as the article's markdown H1.
-->

<!-- Introductory paragraph
Required. Light intro that briefly describes what the how-to will cover and any default Dapr characteristics. Link off to the appropriate concept or overview docs to provide context. -->

<!--
Include a diagram or image, if possible.
-->

<!--
If applicable, link to the related quickstart in a shortcode note or alert with text like:

 If you haven't already, [try out the <topic> quickstart](link) for a quick walk-through on how to use <topic>.

-->

<!--
Make sure the how-to includes examples for multiple programming languages, OS, or deployment targets, if applicable.
-->

## <Action or task>

<!--
Unlike quickstarts, do not use "Step 1", "Step 2", etc.
-->

## <Action or task>

<!--
Each H2 step should start with a verb/action word.
-->

<!--
Include code snippets where possible.
-->

## Next steps

<!--
Link to related pages and examples. For example, the building block overview, the related tutorial, API reference, etc.
-->
7 - SDK contributing guide
7.1 - Contributing to the .NET SDK
Welcome!
If you’re reading this, you’re likely interested in contributing to Dapr and/or the Dapr .NET SDK. Welcome to the project and thank you for your interest in contributing!
Please review the documentation, familiarize yourself with what Dapr is and what it’s seeking to accomplish and reach out on Discord. Let us know how you’d like to contribute and we’d be happy to chime in with ideas and suggestions.
There are many ways to contribute to Dapr:
- Submit bug reports for the Dapr runtime or the Dapr .NET SDK
- Propose new runtime capabilities or SDK functionality
- Improve the documentation in either the larger Dapr project or the Dapr .NET SDK specifically
- Add new or improve existing components that implement the various building blocks
- Augment the .NET pluggable component SDK capabilities
- Improve the Dapr .NET SDK code base and/or fix a bug (detailed below)
If you’re new to the code base, please feel encouraged to ask in the #dotnet-sdk channel in Discord about how to implement changes or generally ask questions. You are not required to seek permission to work on anything, but do note that if an issue is assigned to someone, it’s an indication that someone might have already started work on it. Especially if it’s been a while since the last activity on that issue, please feel free to reach out and see if it’s still something they’re interested in pursuing or whether you can take over, and open a pull request with your implementation.
If you’d like to assign yourself to an issue, respond to the conversation with “/assign” and the bot will assign you to it.
We have labeled some issues as good-first-issue or help wanted indicating that these are likely to be small,
self-contained changes.
If you’re not certain about your implementation, please create it as a draft pull request and solicit feedback
from the .NET maintainers by tagging
@dapr/maintainers-dotnet-sdk and providing some context about what you need assistance with.
Contribution Rules and Best Practices
When contributing to the .NET SDK the following rules and best-practices should be followed.
Pull Requests
Pull requests that contain only formatting changes are generally discouraged. Pull requests should instead seek to fix a bug, add new functionality, or improve on existing capabilities.
Do aim to minimize the contents of your pull request to span only a single issue. Broad PRs that touch on a lot of files are not likely to be reviewed or accepted in a short timeframe. Accommodating many different issues in a single PR makes it hard to determine whether your code fully addresses the underlying issue(s) or not and complicates the code review.
Tests
All pull requests should include unit and/or integration tests that reflect the nature of what was added or changed so it’s clear that the functionality works as intended. Avoid using auto-generated tests that duplicate testing the same functionality several times. Rather, seek to improve code coverage by validating each possible path of your changes so future contributors can more easily navigate the contours of your logic and more readily identify limitations.
Examples
The examples directory contains code samples for users to run to try out specific functionality of the various
Dapr .NET SDK packages and extensions. When writing new and updated samples keep in mind:
- All examples should be runnable on Windows, Linux, and MacOS. While .NET Core code is consistent among operating systems, any pre/post example commands should provide options through tabpane
- Contain steps to download/install any required pre-requisites. Someone coming in with a fresh OS install should be able to start on the example and complete it without an error. Links to external download pages are fine.
Documentation
The daprdocs directory contains the markdown files that are rendered into the Dapr Docs website. When the
documentation website is built this repo is cloned and configured so that its contents are rendered with the docs
content. When writing docs keep in mind:
- All rules in the docs guide should be followed in addition to these.
- All files and directories should be prefixed with
dotnet-to ensure all file/directory names are globally - unique across all Dapr documentation.
All pull requests should strive to include both XML documentation in the code clearly indicating what functionality does and why it’s there as well as changes to the published documentation to clarify for other developers how your change improves the Dapr framework.
GitHub Dapr Bot Commands
Checkout the daprbot documentation for Github commands you can run in this repo for common tasks. For example,
you can comment /assign on an issue to assign it to yourself.
Commit Sign-offs
All code submitted to the Dapr .NET SDK must be signed off by the developer authoring it. This means that every commit must end with the following:
Signed-off-by: First Last flast@example.com
The name and email address must match the registered GitHub name and email address of the user committing the changes. We use a bot to detect this in pull requests and we will be unable to merge the PR if this check fails to validate.
If you notice that a PR has failed to validate because of a failed DCO check early on in the PR history, please consider squashing the PR locally and resubmitting to ensure that the sign-off statement is included in the commit history.
Languages, Tools and Processes
All source code in the Dapr .NET SDK is written in C# and targets the latest language version available to the earliest supported .NET SDK. As of v1.16, this means that both .NET 8 and .NET 9 are supported. The latest language version available is C# version 12
Contributors are welcome to use whatever IDE they’re most comfortable developing in, but please do not submit IDE-specific preference files along with your contributions as these will be rejected.
7.2 - Contributing to the Go SDK
When contributing to the Go SDK the following rules and best-practices should be followed.
Examples
The examples directory contains code samples for users to run to try out specific functionality of the various Go SDK packages and extensions. When writing new and updated samples keep in mind:
- All examples should be runnable on Windows, Linux, and MacOS. While Go code is consistent among operating systems, any pre/post example commands should provide options through tabpane
- Contain steps to download/install any required pre-requisites. Someone coming in with a fresh OS install should be able to start on the example and complete it without an error. Links to external download pages are fine.
Docs
The daprdocs directory contains the markdown files that are rendered into the Dapr Docs website. When the documentation website is built this repo is cloned and configured so that its contents are rendered with the docs content. When writing docs keep in mind:
- All rules in the docs guide should be followed in addition to these.
- All files and directories should be prefixed with
go-to ensure all file/directory names are globally unique across all Dapr documentation.
7.3 - Contributing to the Java SDK
When contributing to the Java SDK the following rules and best-practices should be followed.
Examples
The examples directory contains code samples for users to run to try out specific functionality of the various Java SDK packages and extensions. When writing new and updated samples keep in mind:
- All examples should be runnable on Windows, Linux, and MacOS. While Java code is consistent among operating systems, any pre/post example commands should provide options through tabpane
- Contain steps to download/install any required pre-requisites. Someone coming in with a fresh OS install should be able to start on the example and complete it without an error. Links to external download pages are fine.
Docs
The daprdocs directory contains the markdown files that are rendered into the Dapr Docs website. When the documentation website is built, this repo is cloned and configured so that its contents are rendered with the docs content. When writing docs, keep in mind:
- All rules in the docs guide should be followed in addition to these.
- All files and directories should be prefixed with
java-to ensure all file/directory names are globally unique across all Dapr documentation.
Github Dapr Bot Commands
Checkout the daprbot documentation for Github commands you can run in this repo for common tasks. For example, you can run the /assign (as a comment on an issue) to assign the issue to yourself.
7.4 - Contributing to the JavaScript SDK
When contributing to the JavaScript SDK the following rules and best-practices should be followed.
💡 You can run npm pretty-fix to run prettier on all your files
Commit Guidelines
The Dapr Javascript SDK uses the Conventional Commits specification. The automatic changelog tool uses these to automatically generate a changelog based on the commit messages. Here’s a guide to writing a commit message to allow this:
Format
type(scope)!: subject
type: the type of the commit is one of the following:feat: new features.fix: bug fixes.docs: documentation changes.refactor: refactor of a particular code section without introducing new features or bug fixes.style: code style improvements.perf: performance improvements.test: changes to the test suite.ci: changes to the CI system.build: changes to the build system (we don’t yet have one so this shouldn’t apply).chore: for other changes that don’t match previous types. This doesn’t appear in the changelog.
scope: section of the codebase that the commit makes changes to. If it makes changes to many sections, or if no section in particular is modified, leave blank without the parentheses. Examples:- Commit that adds a
test:
test(actors): add an actor test- Commit that changes many things at once:
style: adopt eslintFor changes to examples, the scope should be the example name with the
examples/prefix:- ❌
fix(agnoster): commit subject - ✅
fix(examples/http/actor): commit subject
- Commit that adds a
!: this goes after thescope(or thetypeif scope is empty), to indicate that the commit introduces breaking changes.Optionally, you can specify a message that the changelog tool will display to the user to indicate what’s changed and what they can do to deal with it. You can use multiple lines to type this message; the changelog parser will keep reading until the end of the commit message or until it finds an empty line.
Example (made up):
style(agnoster)!: change dirty git repo glyph BREAKING CHANGE: the glyph to indicate when a git repository is dirty has changed from a Powerline character to a standard UTF-8 emoji. Fixes #420 Co-authored-by: Username <email>subject: a brief description of the changes. This will be displayed in the changelog. If you need to specify other details you can use the commit body but it won’t be visible.Formatting tricks: the commit subject may contain:
Links to related issues or PRs by writing
#issue. This will be highlighted by the changelog tool:feat(archlinux): add support for aura AUR helper (#9467)Formatted inline code by using backticks: the text inbetween backticks will also be highlighted by the changelog tool:
feat(shell-proxy): enable unexported `DEFAULT_PROXY` setting (#9774)
Style
Try to keep the first commit line short. This is harder to do using this commit style but try to be concise and if you need more space, you can use the commit body. Try to make sure that the commit subject is clear and precise enough that users will know what change by just looking at the changelog.
Github Dapr Bot Commands
Checkout the daprbot documentation for Github commands you can run in this repo for common tasks. For example, you can run the /assign (as a comment on an issue) to assign issues to a user or group of users.
Coding Rules
To ensure consistency throughout the source code, keep these rules in mind as you are working:
- All features or bug fixes must be tested by one or more specs (unit-tests).
- All public API methods must be documented.
- We follow ESLint RecommendedRules.
Examples
The examples directory contains code samples for users to run to try out specific functionality of the various JavaScript SDK packages and extensions. When writing new and updated samples keep in mind:
- All examples should be runnable on Windows, Linux, and MacOS. While JavaScript code is consistent among operating systems, any pre/post example commands should provide options through tabpane.
- Contain steps to download/install any required pre-requisites. Someone coming in with a fresh OS install should be able to start on the example and complete it without an error. Links to external download pages are fine.
Docs
The daprdocs directory contains the markdown files that are rendered into the Dapr Docs website. When the documentation website is built, this repo is cloned and configured so that its contents are rendered with the docs content. When writing docs, keep in mind:
- All rules in the docs guide should be followed in addition to these.
- All files and directories should be prefixed with
js-to ensure all file/directory names are globally unique across all Dapr documentation.
7.5 - Contributing to the Python SDK
When contributing to the Python SDK the following rules and best-practices should be followed.
Examples
The examples directory contains code samples for users to run to try out specific functionality of the various Python SDK packages and extensions. When writing new and updated samples keep in mind:
- All examples should be runnable on Windows, Linux, and MacOS. While Python code is consistent among operating systems, any pre/post example commands should provide options through tabpane
- Contain steps to download/install any required pre-requisites. Someone coming in with a fresh OS install should be able to start on the example and complete it without an error. Links to external download pages are fine.
Docs
The daprdocs directory contains the markdown files that are rendered into the Dapr Docs website. When the documentation website is built this repo is cloned and configured so that its contents are rendered with the docs content. When writing docs keep in mind:
- All rules in the docs guide should be followed in addition to these.
- All files and directories should be prefixed with
python-to ensure all file/directory names are globally unique across all Dapr documentation.
Github Dapr Bot Commands
Checkout the daprbot documentation for Github commands you can run in this repo for common tasks. For example, you can run the /assign (as a comment on an issue) to assign issues to a user or group of users.
7.6 - Contributing to the Rust SDK
When contributing to the Rust SDK the following rules and best-practices should be followed.
Examples
The examples directory contains code samples for users to run to try out specific functionality of the various Rust SDK packages and extensions. It also hosts component examples used for validation. When writing new and updated samples keep in mind:
- All examples should be runnable on Windows, Linux, and MacOS. While Rust code is consistent among operating systems aside from minor OS-feature gating, any pre/post example commands should provide options through tabpane
- Contain steps to download/install any required pre-requisites. Someone coming in with a fresh OS install should be able to start on the example and complete it without an error. Links to external download pages are fine.
- Examples should be pass validation and include mechanical markdown steps and be added to the validation workflow TBA
Docs
The daprdocs directory contains the markdown files that are rendered into the Dapr Docs website. When the documentation website is built this repo is cloned and configured so that its contents are rendered with the docs content. When writing docs keep in mind:
- All rules in the docs guide should be followed in addition to these.
- All files and directories should be prefixed with
rust-to ensure all file/directory names are globally unique across all Dapr documentation.
Update Protobufs
To pull the protobufs from the dapr/dapr repo you can run the script in the repo root like so:
./update-protos.sh
By default, the script fetches the latest proto updates from the master branch of the Dapr repository. If you need to choose a specific release or version, use the -v flag:
./update-protos.sh -v v1.13.0
8 - Contributing to Dapr Agents
When contributing to Dapr Agents, the following rules and best-practices should be followed.
Examples
The examples directory contains code samples for users to run to try out specific functionality of the various Dapr Agents packages and extensions. When writing new and updated samples keep in mind:
- All examples should be runnable on Windows, Linux, and MacOS. While Python code is consistent among operating systems, any pre/post example commands should provide options through codetabs
- Contain steps to download/install any required pre-requisites. Someone coming in with a fresh OS install should be able to start on the example and complete it without an error. Links to external download pages are fine.
Dependencies
This project uses modern Python packaging with pyproject.toml. Dependencies are managed as follows:
- Main dependencies are in
[project.dependencies] - Test dependencies are in
[project.optional-dependencies.test] - Development dependencies are in
[project.optional-dependencies.dev]
Generating Requirements Files
If you need to generate requirements files (e.g., for deployment or specific environments):
# Generate requirements.txt
pip-compile pyproject.toml

# Generate dev-requirements.txt
pip-compile pyproject.toml --extra dev
Installing Dependencies
# Install main package with test dependencies
pip install -e ".[test]"

# Install main package with development dependencies
pip install -e ".[dev]"

# Install main package with all optional dependencies
pip install -e ".[test,dev]"
Testing
The project uses pytest for testing. To run tests:
# Run all tests
tox -e pytest

# Run specific test file
tox -e pytest tests/test_random_orchestrator.py

# Run tests with coverage
tox -e pytest --cov=dapr_agents
Code Quality
The project uses several tools to maintain code quality:
# Run linting
tox -e flake8

# Run code formatting
tox -e ruff

# Run type checking
tox -e type
Development Workflow
Install development dependencies:
pip install -e ".[dev]"Run tests before making changes:
tox -e pytestMake your changes
Run code quality checks:
tox -e flake8
tox -e ruff
tox -e type
Run tests again:
tox -e pytestSubmit your changes
GitHub Dapr Bot Commands
Checkout the daprbot documentation for GitHub commands you can run in this repo for common tasks. For example, you can run the /assign (as a comment on an issue) to assign issues to a user or group of users.
Feedback
Was this page helpful?
9 - Protocol Reference
This section provides a deep dive into the internal workings of the Dapr runtime. It is intended for maintainers, contributors, and anyone interested in the low-level implementation details of Dapr’s building blocks.
Unlike the user-facing API reference, these documents focus on:
- How the runtime processes requests.
- Internal state transitions.
- Interaction with component interfaces.
- Protocol-level details (gRPC and HTTP).
Building Blocks
Select a building block to explore its internal protocol and mechanics:
9.1 - Workflow Protocol
This document specifies the Dapr Workflow protocol and runtime contract at a low level. It targets SDK authors building Workflow Workers and runtime maintainers evolving the Dapr sidecar’s Workflow Engine.
Overview
Dapr Workflow implements a sidecar-as-scheduler pattern: the Dapr runtime (sidecar) acts as the Workflow Engine, and the application SDK acts as the Workflow Worker. All control and execution traffic flows over gRPC.
There are two protocol surfaces:
- Management API (standard Dapr gRPC accessible via SDK):
- Start, terminate, pause, resume, re-run, purge and query workflow instances.
- Execution API (Task Hub Protocol):
- Worker facing, used to receive orchestration/activity work items and to report completion (e.g., via
TaskHubSidecarService).
- Worker facing, used to receive orchestration/activity work items and to report completion (e.g., via
Key Components
Workflow Engine (Dapr Sidecar)
Manages workflow state transitions, history persistence, scheduling of orchestration and activity tasks, and reliable delivery semantics. By default, it leverages Dapr Actors as the backend for durable, partitioned execution.
Workflow Worker (Application SDK)
Connects to the sidecar, polls for orchestration and activity work items, executes user-defined logic, and returns results, failures, and heartbeats to the engine. Orchestration logic must be deterministic; activity logic need not be.
Orchestration
The deterministic coordinator that defines the workflow. The engine drives orchestrations via history replay to rebuild state and schedule outbound tasks (activities, sub-orchestrations, timers, external events).
Activity
The atomic unit of work. Activities are executed at-least-once and report results or failures back to the engine. Idempotency is recommended and task execution identifiers are available on context to assist with this.
State Store & Backend
Workflow history and state are durably persisted. The engine typically implements a task hub pattern over the chosen persistence and uses Dapr Actors as the default reliability substrate.
Execution Model
Dapr Workflow is based on the Durable Task Framework (DTFx) execution semantics:
Replay-based Execution
Orchestrators are replayed from their event history to rebuild deterministic state. All nondeterministic operations (time, random values, I/O) must be mediated by the engine (e.g., timers, activity calls, external events).
Deterministic Orchestrators
Orchestrator code must be side-effect free except via engine-mediated effects. Control flow must be reproducible during replay.
At-least-once Activities, Exactly-once State Commit
Activities may be delivered more than once. The engine ensures workflow state commits are idempotent and applied exactly once.
Sidecar-as-Scheduler
The sidecar owns scheduling and persists all history/events before dispatching work to workers. Workers are stateless executors from the engine’s perspective.
Protocol Surfaces
- Management API (Standard Dapr gRPC)
- Start Workflow: Create and persist an initial history event; return instance metadata
- Terminate / Pause/ Resume: Drive lifecycle transitions through persisted control events.
- Query: Retrieve instance status, history, output, failure details, and custom metadata.
- Re-run: Start a new workflow instance from a history event.
- Purge: Proactively clear workflow history and state.
Note: See: Management API specification for exact RPC shapes, error codes and semantics.
- Execution API (Task Hub Protocol)
- Poll for Work: Workers fetch orchestration and activity work items.
- Complete / Fail Work: Workers report completion results or failures; the engine appends these to history and advances orchestration progress.
- Heartbeats / Leases: Optional mechanisms for long-running activities and cooperative rebalancing.
- Timers & External Events: Delivered to orchestrations as history events to keep replay deterministic.
Note: See Execution API specification defining
TaskHubSidecarServicecontracts, payload schemas and sequencing rules.
Request & Runtime Lifecycle
- Start Workflow
- Client calls
StartWorkflowvia the Management API. - Engine persists the initial event (e.g.,
ExecutionStarted) and materializes an instance.
- Orchestrator Execution (Replay-driven)
- Engine replays orchestration history to rehydrate state.
- Orchestrator schedules effects (activities, sub-orchestrations, timers) by issuing commands, which the engine persists as new history events.
- Activity Dispatch & Execution
- Engine dispatches activity work items to workers
- Worker runs the activity (may be retried and delivered at least once).
- Worker responds with completion (result) or failure; engine appends to history.
- Timers & External Signals
- Engine delivers timer fired or external event records as history entries.
- Orchestrator consumes these deterministically on next replay.
- Progress & Checkpointing
- Each step appends to the history log and advances orchestration state.
- The engine safeguards idempotence and exactly-once commit of orchestration state.
- Completion
- Orchestration returns an output (success) or a failure (exception details).
- Final state and output are persisted; status queries reflect the terminal state.
Protocol Principles
- GRIEF (GRpc IntErFace): All worker/engine and client/engine communication is gRPC.
- Replay-based Orchestration: Determinism enforced through history replay.
- At-least-once Activity Delivery: Activities may re-execute; design for idempotency.
- Engine-mediated Effects: All nondeterminism/time/IO flows through the engine to remain replay-safe.
Documentation Map
- Management API Detailed Dapr gRPC control-plane operations and payloads.
- Execution API (Task Hub Protocol)
TaskHubSidecarServiceworker protocol, work item contracts, result/failure reporting, and sequencing. - Orchestration Lifecycle Replay semantics, scheduling, external events, timers, and completion.
- Activity Lifecycle Dispatch, retries, idempotency, heartbeat semantics, and failure handling.
- State & History History schema, state snapshots, and persistence guarantees.
- Versioning How Dapr handles multiple versions of the same workflow definition.
9.1.1 - Workflow Protocol - Management API
Workflow Management API
The Workflow Management API allows Dapr clients to control the lifecycle of workflow instances. These APIs are exposed via the standard Dapr gRPC endpoint and are typically made available via the SDKs.
gRPC Service Definition
The management APIs are part of the Dapr service in dapr.proto.runtime.v1. While multiple versions
(Alpha1, Beta1) may exist, the following describes the current implementation logic.
StartWorkflow
Starts a new instance of a workflow.
Request (StartWorkflowRequest):
| Field | Type | Description |
|---|---|---|
instance_id | string | Optional. A unique identifier for the workflow instance. If not provided, Dapr will generate a random UUID. |
workflow_component | string | The name of the workflow component to use. Currently, Dapr uses the built-in engine. |
workflow_name | string | The name of the workflow definition to execute. |
options | map<string, string> | Optional. Component-specific options. |
input | bytes | Optional. Input data for the workflow instance, typically a JSON-serialized string. |
Response (StartWorkflowResponse):
| Field | Type | Description |
|---|---|---|
instance_id | string | The ID of the started workflow instance. |
GetWorkflow
Retrieves the current status and metadata of a workflow instance.
Request (GetWorkflowRequest):
| Field | Type | Description |
|---|---|---|
instance_id | string | The ID of the workflow instance to query. |
workflow_component | string | The name of the workflow component. |
Response (GetWorkflowResponse):
| Field | Type | Description |
|---|---|---|
instance_id | string | The ID of the workflow instance. |
workflow_name | string | The name of the workflow. |
created_at | Timestamp | The time the instance was created. |
last_updated_at | Timestamp | The time the instance was last updated. |
runtime_status | string | The status (e.g., RUNNING, COMPLETED, FAILED, TERMINATED, PENDING). |
properties | map<string, string> | Additional component-specific metadata. |
TerminateWorkflow
Forcefully terminates a running workflow instance.
Request (TerminateWorkflowRequest):
| Field | Type | Description |
|---|---|---|
instance_id | string | The ID of the workflow instance to terminate. |
workflow_component | string | The name of the workflow component. |
RaiseEventWorkflow
Sends an event to a running workflow instance.
Request (RaiseEventWorkflowRequest):
| Field | Type | Description |
|---|---|---|
instance_id | string | The ID of the workflow instance. |
workflow_component | string | The name of the workflow component. |
event_name | string | The name of the event to raise. |
event_data | bytes | The data associated with the event. |
PauseWorkflow & ResumeWorkflow
Pauses or resumes a workflow instance.
Request (PauseWorkflowRequest / ResumeWorkflowRequest):
| Field | Type | Description |
|---|---|---|
instance_id | string | The ID of the workflow instance. |
workflow_component | string | The name of the workflow component. |
PurgeWorkflow
Removes all state and history associated with a workflow instance. This can usually only be done for completed, failed, or terminated instances.
Request (PurgeWorkflowRequest):
| Field | Type | Description |
|---|---|---|
instance_id | string | The ID of the workflow instance. |
workflow_component | string | The name of the workflow component. |
ListInstanceIDs (Task Hub Protocol Only)
Retrieves a list of workflow instance IDs, optionally filtered by status or name. This is currently part of the internal Task Hub protocol and used for pagination in management tools.
Request (ListInstanceIDsRequest):
| Field | Type | Description |
|---|---|---|
page_size | int32 | The maximum number of IDs to return. |
continuation_token | string | An opaque token used to retrieve the next page of results. |
Response (ListInstanceIDsResponse):
| Field | Type | Description |
|---|---|---|
instance_ids | repeated string | The list of instance IDs. |
continuation_token | string | A token for the next page of results. |
Continuation Tokens and Pagination
The continuation_token is an opaque string generated by the Dapr runtime (and the underlying state store).
Its purpose is to allow clients to reliably paginate through large sets of workflow instances without loading all
IDs into memory at once.
SDK Requirements for Continuation Tokens:
- Opaqueness: The SDK MUST treat this token as a black box. It should not attempt to parse, modify, or construct its own tokens.
- State Management: When the SDK receives a
ListInstanceIDsResponse, it should store thecontinuation_tokenif it intends to fetch more results. - Request Propagation: To fetch the next page, the SDK MUST pass the exact
continuation_tokenreceived from the previous response into the nextListInstanceIDsRequest. - Termination: An empty or null
continuation_tokenin the response indicates that there are no more pages to retrieve.
Runtime Behavior:
The runtime derives this token from the state store’s KeysLike operation. Because it is tied to the underlying
database’s pagination mechanism, the token may have an expiration or be tied to the specific query parameters
(like page_size) used in the initial request.
Implementation Details
The sidecar receives these requests and translates them into operations on the underlying durabletask-go client.
For example, StartWorkflow calls the backend to create a new orchestration instance and enqueue an
ExecutionStarted event.
9.1.2 - Workflow Protocol - Execution API
Workflow Execution API (Task Hub Protocol)
The Workflow Execution API is a low-level gRPC protocol used by Dapr Workflow SDKs to act as “Workers”. The SDK connects to the Dapr sidecar via this protocol to poll for work and report completion.
The service is named TaskHubSidecarService.
Service Definition (gRPC)
service TaskHubSidecarService {
  rpc GetWorkItems(GetWorkItemsRequest) returns (stream WorkItem);
  rpc CompleteOrchestratorTask(OrchestratorResponse) returns (CompleteBatchResponse);
  rpc CompleteActivityTask(ActivityResponse) returns (CompleteBatchResponse);
  // ... other management methods
}
Worker Lifecycle
- Connection: The SDK opens a long-running bidirectional stream to
GetWorkItems. - Polling: The SDK receives
WorkItemmessages from the stream. - Execution:
- If the work item is an Orchestration, the SDK retrieves and replays the history events to determine the next actions.
- If the work item is an Activity, the SDK executes the activity logic.
- Completion:
- For Orchestrations, the SDK calls
CompleteOrchestratorTaskwith a list of actions to take. - For Activities, the SDK calls
CompleteActivityTaskwith the result or failure information.
- For Orchestrations, the SDK calls
gRPC Service: TaskHubSidecarService
GetWorkItems
Opens a stream to receive work items for orchestrations and activities.
Request (GetWorkItemsRequest):
Typically empty or contains worker metadata.
Response (stream WorkItem):
A WorkItem can be one of:
orchestrator_item: Contains history and new events for an orchestration.activity_item: Contains details for a single activity task.
CompleteOrchestratorTask
Reports the results of an orchestration execution.
Request (OrchestratorResponse):
instance_id: The ID of the workflow instance.actions: A list ofOrchestratorActionmessages.custom_status: Optional string for user-defined status.
OrchestratorAction Types:
ScheduleTask: Schedule a new activity.CreateTimer: Schedule a durable timer.CreateSubOrchestration: Start a child workflow.CompleteOrchestration: Mark the workflow as completed (success or failure).TerminateOrchestration: Forcefully terminate the instance.SendEvent: Send an event to another workflow.
CompleteActivityTask
Reports the result of an activity execution.
Request (ActivityResponse):
instance_id: The ID of the workflow instance.task_id: The unique ID of the activity task.completion_token: The opaque token received in theActivityWorkItem.result: The serialized output of the activity (if successful).failure_details: Details about the error (if failed).
Data Models
HistoryEvent
Workflows in Dapr are event-sourced. The state of an orchestration is rebuilt by replaying a sequence of
HistoryEvent messages.
Common event types:
ExecutionStarted: Initial event containing workflow name and input.TaskScheduled: An activity was scheduled.TaskCompleted: An activity finished successfully.TaskFailed: An activity failed.TimerCreated: A timer was scheduled.TimerFired: A timer expired.OrchestrationCompleted: The workflow finished.
FailureDetails
Used to report errors from activities or orchestrations.
error_type: A string identifying the type of error.error_message: A human-readable error message.stack_trace: Optional stack trace.is_non_retriable: Boolean flag.
Protocol Nuances
- Streaming:
GetWorkItemsis a server-to-client stream. Dapr pushes work to the SDK as it becomes available. - Sticky Sessions: Dapr attempts to send work items for the same instance to the same worker if possible, but the SDK must not rely on this for correctness.
- Determinism: The SDK must ensure that the orchestration logic is deterministic. During replay, the SDK
uses the history provided in the
OrchestratorWorkItemto avoid re-executing actions that have already been recorded.
9.1.3 - Workflow Protocol - Orchestration Lifecycle
Orchestration Lifecycle
This document describes the lifecycle of an orchestration at the protocol level, specifically how the Dapr engine and the SDK interact to execute workflow logic reliably.
Replay-based Execution
Dapr Workflows use event sourcing and replay to maintain state. Instead of saving the entire state of the worker process (stack, variables, etc.), Dapr saves a history of events that have occurred.
The Replay Loop
- Work Item Arrival: The Dapr engine sends an
OrchestratorWorkItemto the SDK via theGetWorkItemsstream. This work item contains the full history of the workflow instance plus any new events (e.g., an activity completion or an external event). - Reconstruction: The SDK starts executing the orchestration function from the very beginning.
- Deterministic Execution: As the function executes, it encounters “tasks” (e.g., calling an activity, sleeping).
- For each task, the SDK checks the provided History to see if that task has already completed.
- If the task is in the history, the SDK returns the recorded result immediately without actually re-executing the task logic.
- If the task is NOT in the history, the SDK records that this task needs to be scheduled and suspends execution of the orchestration function (typically by throwing a special exception or returning a pending promise).
- Reporting: Once the orchestration function is suspended or completes, the SDK sends a
CompleteOrchestratorTaskrequest to Dapr. This request contains a list of Actions (e.g.,ScheduleTask,CreateTimer) that the engine should perform. - State Commitment: The Dapr engine receives the actions, updates the workflow history in the state store, and schedules any requested tasks (e.g., by sending work to an activity worker).
Step-by-Step Example
Imagine a workflow: Activity A -> Activity B.
1. Workflow Start
- Engine: Enqueues
ExecutionStartedevent. - SDK: Receives
OrchestratorWorkItemwith[ExecutionStarted]. - SDK: Runs function. Function calls
Activity A. - SDK: Checks history.
Activity Ais not there. - SDK: Suspends. Sends
CompleteOrchestratorTaskwith[ScheduleTask(Activity A)]. - Engine: Records
TaskScheduled(Activity A)in history.
2. Activity A Completes
- Engine: Records
TaskCompleted(Activity A, result="foo")in history. - SDK: Receives
OrchestratorWorkItemwith[ExecutionStarted, TaskScheduled(A), TaskCompleted(A)]. - SDK: Runs function from the start.
- SDK: Function calls
Activity A. SDK findsTaskCompleted(A)in history. Returns"foo". - SDK: Function calls
Activity B. - SDK: Checks history.
Activity Bis not there. - SDK: Suspends. Sends
CompleteOrchestratorTaskwith[ScheduleTask(Activity B)]. - Engine: Records
TaskScheduled(Activity B).
3. Workflow Completion
- Activity B completes.
- SDK: Receives history with both A and B completed.
- SDK: Runs function. Both A and B return results from history.
- SDK: Function finishes and returns a final result.
- SDK: Sends
CompleteOrchestratorTaskwith[CompleteOrchestration(result="final")]. - Engine: Records
OrchestrationCompletedand marks the instance asCOMPLETED.
Critical Requirements for SDK Authors
1. Determinism
The orchestration function MUST be deterministic. It cannot use:
- Random numbers.
- Current date/time (must use a durable timer or a provided
CurrentUtcDateTime). - Direct IO (must be done in activities).
- Global state that can change between replays.
2. Patching (In-flight updates)
When a workflow is already running, you might need to update its logic. However, since workflows are replay-based, changing the logic directly would break determinism for in-flight instances.
Dapr provides a Patching mechanism (e.g., ctx.IsPatched("patch-id")) to safely introduce changes:
- Logic Branching: The SDK provides an API to check if a specific “patch” is active for the current instance.
- Patch Recording: When a patch check is encountered during execution, the result (true/false) is recorded in the workflow history.
- Consistency: Once a patch is recorded as active (or inactive) for an instance, it remains so for the lifetime of that instance, even if the worker code changes or the instance is moved to another worker.
- Safety: The Dapr engine validates that the sequence of patches encountered during replay exactly matches the sequence in history. If there’s a mismatch, the workflow enters a Stalled state to prevent data corruption.
3. Named Versions (In-flight updates)
Dapr also provides a Named Versioning mechanism wherein the SDK maintains a registry of available named workflow versions. When it receives a request to initialize a new workflow by name, it’ll consult the registry to determine if the name is a match for a different workflow version than the workflow name specified and is responsible for redirecting the request to the intended “latest” version.
- Logic Branching: The SDK provides an API to register different versions for a given workflow name.
- Replay Consistency: The request to run a workflow may contain a property specifying a specific workflow name to execute. This ensures that in-flight workflows will always run using the same workflow version whereas new workflows will use the latest available version.
3. Stalled State
A workflow instance enters the STALLED state when the engine detects an unrecoverable condition that requires manual
intervention or a code fix to proceed. Common reasons include:
- Patch Mismatch: The current code’s patching logic contradicts the instance’s history.
- Execution Errors: A fatal error occurred that cannot be handled by retries.
When stalled, the instance stops execution but remains in the system. Once the underlying issue is resolved (e.g., the correct code version is deployed), the instance can be resumed or will automatically resume on the next event.
4. History Management
The SDK must efficiently search the history. Typically, this is done by maintaining a counter of tasks encountered during execution and matching them against the sequence of events in the history.
5. Graceful Suspension
The SDK needs a mechanism to stop execution of the orchestration function when a task is scheduled but not yet completed, without losing the ability to restart it later.
9.1.4 - Workflow Protocol - Activity Lifecycle
Activity Lifecycle
Activities are the basic units of work in a Dapr Workflow. Unlike orchestrations, activities are not replayed and do not need to be deterministic. They are executed exactly once per “schedule” (though retries may occur).
Execution Flow
- Scheduling: An orchestration requests an activity by sending a
ScheduleTaskaction to the Dapr engine. - Work Item Dispatch: The Dapr engine enqueues an activity task. When an activity worker (SDK) is available, the
engine sends an
ActivityWorkItemvia theGetWorkItemsstream. - Execution: The SDK receives the
ActivityWorkItem, which contains:name: The name of the activity to execute.input: The input data for the activity.instance_id: The ID of the workflow instance that scheduled the activity.task_id: A unique identifier for this specific activity execution.task_execution_id: A unique identifier for the specific attempt of this activity. This is useful for implementing idempotency in activity logic.completion_token: An opaque token used to correlate the response with this specific work item.
- Reporting: After the activity logic finishes, the SDK sends a
CompleteActivityTaskrequest back to Dapr.- Success: The SDK provides the serialized output in the
resultfield. - Failure: The SDK provides
failure_details(error message, type, stack trace).
- Success: The SDK provides the serialized output in the
Task Execution IDs
The task_execution_id (also known as the Task Execution Key) is a unique, runtime-generated string (typically a UUID)
that identifies a specific attempt to execute an activity task.
Why it matters to the SDK
While the Workflow SDK is generally stateless between work items, the task_execution_id provides critical context
for the Activity Worker:
- Distributed Idempotency: If an activity performs a side effect (e.g., charging a credit card), it
should use the
task_execution_idas an idempotency key. - Distinguishing Retries: Unlike the
task_id(which remains constant for a specific step in the workflow), thetask_execution_idchanges every time the engine retries the activity (e.g., due to a timeout or worker crash). - Zombie Detection: If an activity worker takes too long and the engine times it out and retries on another
worker, the original worker might eventually finish. By checking the
task_execution_idagainst a persistent store or external API, the worker can determine if it is a “zombie” whose results are no longer wanted.
Implementation Guidelines for SDKs:
- Expose to User: The SDK MUST expose the
task_execution_idto the activity implementation logic (e.g., via anActivityContext). - Do Not Cache: The SDK should not attempt to cache or reuse this ID across different work items.
- Opaque Usage: The SDK should treat the value as an opaque string. It is generated by the Dapr sidecar when the activity is dispatched and is not something the SDK needs to create or parse.
Completion Tokens
The completion_token is an opaque string generated by the Dapr runtime and delivered to the SDK as part of the
ActivityWorkItem.
Purpose and Intent
- Response Correlation: The sidecar uses the
completion_tokento reliably match anActivityResponse(fromCompleteActivityTask) to the original task it dispatched. - Stateless Tracking: It allows the sidecar to remain stateless or minimize state lookups when receiving a completion, as the token contains (or points to) the necessary context (instance ID, task ID, etc.).
- Zombie Prevention: If an activity times out and is retried, the new attempt will have a different
completion_token. If the original “zombie” worker eventually responds with the old token, the sidecar can easily identify and ignore the late response.
SDK Implementation Guidelines
- Capture: The SDK MUST capture the
completion_tokenfrom the incomingActivityWorkItem. - Propagation: The SDK MUST include the exact same
completion_tokenin theActivityResponsesent viaCompleteActivityTask. - Opaqueness: The SDK MUST treat the token as a black box. It should not attempt to parse, modify, or construct its own tokens.
- Storage: While the activity is executing, the SDK must keep this token in memory (e.g., in the
ActivityContext).
Task Activity IDs
In the Dapr runtime (specifically when using the Actors backend), activities are represented as actors. Each activity execution has a unique Task Activity ID (also known as the Activity Actor ID).
The ID follows a specific pattern:
{workflowInstanceID}::{taskID}::{generation}
- workflowInstanceID: The unique ID of the workflow instance that scheduled the activity.
- taskID: The sequence number of the task within the workflow execution (e.g., 0, 1, 2…).
- generation: A counter that increments if the workflow is restarted or “continued as new”.
This unique ID ensures that activity executions are isolated and can be tracked reliably across retries and restarts.
Retries
Dapr handles activity retries based on the policy defined in the orchestration (if the SDK supports defining retry
policies in the ScheduleTask action). If an activity fails and a retry policy is in place, the engine will re-enqueue
the activity task after the specified delay.
From the activity worker’s perspective, a retry is simply a new ActivityWorkItem with the same name and input, but
potentially a different task_id (or the same, depending on the backend implementation).
Idempotency
Because activities might be executed more than once (e.g., if the worker crashes after execution but before reporting completion), it is recommended that activity logic be idempotent where possible.
Comparison with Workflows
| Feature | Orchestration | Activity |
|---|---|---|
| Execution Style | Replay-based (Deterministic) | Direct execution |
| State | Managed via History Events | No internal workflow state |
| Side Effects | Forbidden (must use activities) | Allowed (IO, Database, etc.) |
| Lifetime | Can be long-running (days/months) | Usually short-lived |
| Connectivity | Connected via GetWorkItems | Connected via GetWorkItems |
9.1.5 - Workflow Protocol - State & History
State and History Management
Dapr Workflows are event-sourced, meaning the state of a workflow is derived from a sequence of events. This document describes how Dapr stores and manages this history and state.
Backend Storage: Dapr Actors
By default, the Dapr Workflow engine uses Dapr Actors as its storage backend. Each workflow instance is mapped to a unique actor instance. This provides:
- Concurrency Control: Actors ensure that only one operation is happening on a workflow instance at a time.
- Reliability: Actor state is persisted in the configured Dapr State Store.
- Timers: Dapr Actors provide durable reminders which are used to implement workflow timers.
Workflow State Schema
The state of a workflow instance (actor) consists of several components:
1. Metadata
Stores high-level information about the instance:
instance_id: The unique ID of the workflow.name: The name of the workflow.status: The current runtime status (Running, Completed, Stalled etc.).version: The name of the workflow version and any active patches.created_at: Creation timestamp.last_updated_at: Last activity timestamp.input: Original input data.output: Final output data (if completed).
2. History
A sequence of HistoryEvent objects that record everything that has happened in the workflow.
To optimize for large histories, Dapr often stores history events in chunks or as separate keys in the state store:
- Key Format:
wf-history-<instance_id>-<index> - Event Content: Serialized protobuf message containing event type, timestamp, and type-specific data (e.g.,
TaskScheduled,TaskCompleted).
3. Inbox (Pending Events)
A collection of events that have occurred but have not yet been processed by the orchestrator (replayed). This includes:
- External events raised to the workflow.
- Completed activity results.
- Fired timers.
When the orchestrator next runs, it “drains” the inbox, moves those events into the history, and then replays the logic.
Replay and State Reconstruction
When a worker (SDK) receives a work item, Dapr provides the history events. The SDK reconstructs the internal state of the orchestration (e.g., local variables, current execution point) by replaying these events in order.
Determinism and History
The history is the “source of truth”. If the orchestration code changes in a non-deterministic way (e.g., adding a new activity call in the middle of existing code), the replay will fail because the code’s requests won’t match the recorded history.
Purging State
When a workflow is purged, Dapr deletes the metadata and all associated history event keys from the state store. This is typically done to clean up after finished workflows.
9.1.6 - Workflow Protocol - Versioning
Workflow Versioning
Dapr Workflow supports versioning of workflow definitions, allowing you to update workflow logic while existing instances continue to run on their original logic.
Named Workflow Versioning
When registering a workflow with the Dapr engine, you can provide a version name. This allows multiple versions of the same workflow to coexist.
- Default Version: One version of a workflow can be marked as the default. If a client starts a workflow by name without specifying a version, the default version is used.
- Specific Version: Clients can request a specific version of a workflow when starting a new instance.
Registration API
SDKs register versioned workflows using the AddVersionedOrchestrator (or similar) method in their task registry.
// Example (Internal Registry API)
registry.AddVersionedOrchestrator("MyWorkflow", "v2", true, MyWorkflowV2)
registry.AddVersionedOrchestrator("MyWorkflow", "v1", false, MyWorkflowV1)
Sidecar Versioning
The Dapr sidecar tracks which named version of a workflow an instance is running as well as the list of applied
patches observed up to that point in the workflow execution. This information is stored in the workflow
history within the OrchestratorStarted event’s version field.
message OrchestrationVersion {
  string name = 1;
  repeated string patches = 2;
}
When an instance is resumed (e.g., after an activity completes), the Dapr engine is responsible for recovering from
stalls introduced by a version mismatch on the client. It does so by monitoring changes to the placement table, indicating
that a new SDK client has connected (potentially representing a newer replica instance of the app) and dispatching a
repeat of the last event in an attempt to retry the operation. This time, if the SDK is able to successfully complete
the task, the runtime will chnage the workflow status out of Stalled and back to Running.